Sorry for the terrible layout. This
is only a coverted word doc!
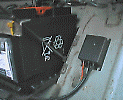
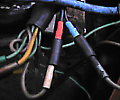
To open the clips you need a 10mm metric wrench. Then route the other two pairs of cables carefully along the main wiring harness to the front of your car to the ignition coil and fix them with cable ties. Be careful that the cables do not rub against any hard and abrade or that they are mounted too close to the exhaust manifold.
page 1
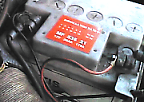
Set ignition timing: To install a new breaker point is unnecessary until your existing set is worn out. An old condensor may, however, cause difficulties even if it worked perfectly before the installation of the new electronic ignition-system. In this case it is your have the choice: a) buy a new one or b) leave it out, although with the condensor in place you have the capability if the electronic ignition-system should fail ( and this I assure you will never happen!) to switch back to the old ignition system. The ignition timing should to be set at 8° before TDC as usual. To do this the LED at the upper side of the case will be of some help. If breaker points open, the LED lights up . However, best results for accurate timing setting are achieved with a strobe light projected and marking on flywheel. The optimum breaker gap is about 0.5 mm (0.02 inch), because then the energy loss of the ignition coil and the ignition-box can be reduced. If you breaker are presently adjusted to the standard difference of 0.4 mm (0.015 inch) you will not need to change the breaker gap. This is so because the quality of the spark is relatively insensitive should the gap be either 0.4 or 0.5 mm. After the new contact set has run in after 5000 to 7000 Km, you can try to advance the timing 2°, 4° or 6°. BUT BE CAREFULL : TO MUCH ADVANCE WILL CAUSE PISTON SEIZING AND DESTROY YOUR ENGINE..................... Spark plugs: Because of the higher spark energy you can use different spark plugs. We recommend the BP 6 HS from NGK or the W5 B or W5 BC from Bosch. Similar types from other manufactures perform OK. The old notation of thermal value range is 225 to 240. The 240 value is the colder type! The electrode gap can be set to 0,9mm (0.035 inch). Check the gap every 10.000 Km (6800 Miles) so it never exceeds 1,1 mm (0.044 inch). Spark plug lifetime is approx. 25000 Km (17 Miles). Attention: If you wash the engine compartment never project the water jet directly onto the ignition-box. Technical datas:
|